Showing posts with label mikrotik. Show all posts
Showing posts with label mikrotik. Show all posts
Friday, October 20, 2017
Bandwidth Stabilizer Script for Mikrotik Router
Bandwidth Stabilizer Script for Mikrotik Router
Internet connection by the Internet service provider (ISP) which has many clients that tends to increase with time goes. The problem comes when the increased number of clients that they have not comparable with the services that they purchased from the first party. From the client side like me can not do anything with ISP services are diminishing because of the large number of their clients. Of course ISP will dodge with a lot of reasons if called has provides with bad services. On this situation it is hard to say which one the best ISP that can provide a good services.
Internet connection that slower than standard bandwidth speed of which we should get caused a lot of possibilities. Such as the quality of the wireless equipment used, technical installation of the wireless network, interference frequencies are used, overload client that the ISP have, and etc. So I dont say that this script will be able to overcome the slow internet connection absolutely. This script just only help to stabilize the connection upon congested traffic, the rest just the ISP that knowing.
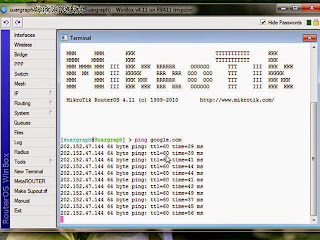
Congested Traffic to be one of the causes of ping enlarge that make connection to be slow. We will harness the ability of Mikrotik in conditioning ping and finding a bus way during congested traffic so that the connection does not hang on. But the most common problem was caused by technical problem associated with the ISP related to the number of clients that they have.
OK we get started immediately for Bandwidth Stabilizer Script On Mikrotik Winbox by making mangle rule on the firewall and queue tree
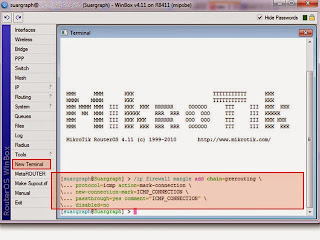
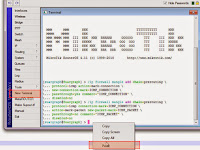
1. Login to the Winbox with account that you have. Then click the New Terminal menu and enter the following script at the cursor terminal window. As shown like the picture below
/ip firewall mangle add chain=prerouting protocol=icmp action=mark-connection new-connection-mark=ICMP_CONNECTION passthrough=yes comment="ICMP_CONNECTION" disabled=no
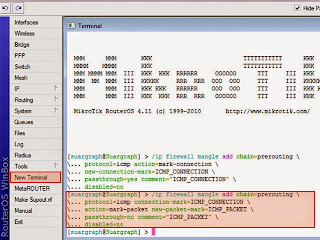
Still in the terminal window, enter the second mangle firewall script below. Right-click at the cursor and paste therein. As shown like the picture below.
/ip firewall mangle add chain=prerouting protocol=icmp connection-mark=ICMP_CONNECTION action=mark-packet new-packet-mark=ICMP_PACKET passthrough=no comment="ICMP_PACKET" disabled=no
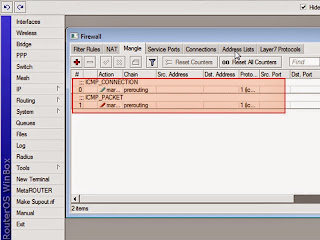
Then you can see the result on the firewall window at mangle tab. The both script that we enter to the terminal window above will create a rule on the firewall mangle on the Mikrotik. As shown like the picture below.
2. The Next we are going to create a queue tree rule. Click on the New terminal again and enter the following script by right click at the cursor on the terminal window and paste therein, as shown like the picture below.
/queue tree add name="==PING_CONDITION==" parent=global-total packet-mark=ICMP_PACKET limit-at=0 queue=default priority=1 max-limit=0 burst-limit=0 burst-threshold=0 burst-time=0s
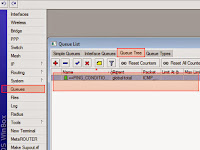
At last we going to see the third script that we have inserted by click on queues>Queue Tree. It will look like at the right picture above. From my experience these script just only to stabilize the connection to avoid hang on when browsing during congested traffic usually at the daytime. If you are curious you can try this! Good Luck!
Available link for download
Saturday, June 24, 2017
Bandwidth Management on Mikrotik using Winbox
Bandwidth Management on Mikrotik using Winbox

Bandwidth share with PCQ (Per Connection Queue) principally is using the queue method to specify the bandwidth usage on the multiple clients. PCQ in the Mikrotik router already installed by default and a program to manage internet traffic network QoS (Quality of Service ). The Method of Bandwidth Management here in order to share bandwidth internet connection is equal among client that you have.
For example we have the internet connection bandwidth of 2000 kbps, and we want to share to 10 clients that will get the bandwidth allotted 2000/10 kbps = 200 kbps. and if we have 5 client that use the internet will divide 2000/5 kbps = 400 kbps. When 10 client using at the time, at the peak condition will get bandwidth quota around 100 kbps each other. Ok lets practice this !
- Assuming we have local network address 192.168.1.0/24 and the interface that connected to the local area network we called as "lan". and the interface that lead that led to the Internet Service Provider (ISP) we called as "public" (note it is up to you give the name of the interface, the function is just distinguish where the name intranet and internet).
- We will use Mikrotik Winbox to be interface software tool
- We will create a firewall setting mark
1. Okay we begin from the First Command
/ip firewall mangle add chain=forward src-address=192.168.1.0/24 action=mark-connection new-connection-mark=NET1-CM
Go to Winbox and, select IP > firewall >Mangle tab then click on "+" button will shown as the picture below:

On the General tab as shown as the picture above fill Chain : with forward, and Src Address : with local network IP address (192.168.1.0/24). After that still on Mangle Rule go to Action tab, will shown as the picture below :

Fill the form fields as shown as the picture above! if you do was right the result can be seen by click on IP > Firewall as shown below!

2. The second command is
/ip firewall mangle add connection-mark=NET1-CM action=mark-packet new-packet-mark=NET1-PM chain=forward
in order to making mark packet
enter through IP > firewall > mangle tab then click on "+" button

You just need to set up chain = forward and Connection Mark = NET1-CM, then go to the action tab

Completed the fields as the picture above, if you do was right, you can see the results by clicking again on IP > Firewall , as shown like the picture bellow :

3. The Third Command is Making queue types “with name of pcq_downstream”
/queue type add name=pcq_downsteam kind=pcq pcq-classifier=dst-address
Return to the main menu select Winbox Queues at Queue List select tab Queue Types then press button "+"

Completed the field as shown like the picture above!, Limit and Total Limit is depending on the ISP bandwidth that you have, in this case the internet connection that use is up to 2 mbps.
4. the Fourth Command is to make queue types “with name pcq_upstream”
/queue type add name=pcq_upstream kind=pcq pcq-classifier=src-address
Still on the main menu select Winbox Queues at Queue List select tab Queue Types then press "+" button

Just like downsteam, upsteam settings as above to adjust with your internet connection limitation totally
5. The Fifth Command is to make queue tree interface “lan”
/queue tree add parent=lan queue=pcq_downsteam packet-mark=NET1-PM
Starting from the main menu select Winbox again Queues at Queue List select tab Queue Three then press "+" button

Adjust the settings as shown like the picture above, the difference is the Parent, depending on your internet connection of your ISP, if you do not know, you can see that by clicking on the menu Interface from the main menu Winbox

In this case the name of lan interface is ether1, public interface is wlan1. if you have already know, completed with your Parent according with the name of your lan interface.
6. the Sixth Command is to make queue tree interface “public”
/queue tree add parent=public queue=pcq_upstream packet-mark=NET1-PM
begin from the main menu select Winbox again Queues at Queue List select tab Queue Three then press "+" button

Surely you can guess already what is the difference about the picture above that is the fields of the Parent, adjust the name according to your public interface.
Ok from six steps above I could have a summary. This is the short way if you dont want to take a long time. Go to the main menu of the winbox, this is the following practical steps:
For more details, lets see the following video ! hopefully useful for you and good luck!
/ip firewall mangle add chain=forward src-address=192.168.1.0/24 action=mark-connection new-connection-mark=NET1-CM
/ip firewall mangle add connection-mark=NET1-CM action=mark-packet new-packet-mark=NET1-PM chain=forward
/queue type add name=pcq_downsteam kind=pcq pcq-classifier=dst-address
/queue type add name=pcq_upstream kind=pcq pcq-classifier=src-address
/queue tree add parent=lan queue=pcq_downsteam packet-mark=NET1-PM
/queue tree add parent=public queue=pcq_upstream packet-mark=NET1-PM
Copy the six comment above into the notepad, and change the IP address marked with red color, green color is lan interface, public interface marked with blue, according to your internet connection. Then go to the main menu of Winbox, and click on the New Terminal. After you have changes the six steps above, then paste by right click on the active Terminal at the cursor./ip firewall mangle add connection-mark=NET1-CM action=mark-packet new-packet-mark=NET1-PM chain=forward
/queue type add name=pcq_downsteam kind=pcq pcq-classifier=dst-address
/queue type add name=pcq_upstream kind=pcq pcq-classifier=src-address
/queue tree add parent=lan queue=pcq_downsteam packet-mark=NET1-PM
/queue tree add parent=public queue=pcq_upstream packet-mark=NET1-PM
For more details, lets see the following video ! hopefully useful for you and good luck!
Available link for download
Subscribe to:
Posts (Atom)