Showing posts with label using. Show all posts
Showing posts with label using. Show all posts
Saturday, August 5, 2017
Beginning to install Squid 3 5 4 Ubuntu Proxy Server in Windows using VMware
Beginning to install Squid 3 5 4 Ubuntu Proxy Server in Windows using VMware

Increase the internet access speed significantly while saving quota bandwidth usage is the main goal of the open source squid development as the proxy server. This far Squid developers have many experiments and improvement to build the proxy server that more stable in high performance. Until the time this article was written, Squid have released version 3.5.4, squid 4 is still experimental. Different with squid 2.7, squid 3.5.x is need to be compiled to use this version. This would give more flexibility in the application and development of squid to build proxy server.
In order to implement squid 3.5.x in Windows operating system directly, it should be compiled by the application before it can be used. Of course If you are a programmer which are used to create software and applications, it would be for you. But for most people, it would be hard to compile the source squid 3.5.x and implement it directly on windows. Some developers have been made easy for you, to install squid 3.5 who has made squid35.msi, but it just compatible in window 64 bit. For this reason I prefer to operating system based on linux, such as ubuntu and debian that make easy to compile this source squid version.
This method can be implemented to the ubuntu server directly you have installed on the real machine or PC without needed some configuration like in virtual machine. In this case I have installed squid 3.5.4 on Ubuntu Server virtual machine on Windows using VMware Workstation Version 10 that still compatible in windows system 32 bit. You have to download and install VMware on your pc at first. VMware installation procedure is common and easy steps, so I don’t need to show with you, you can go for more details about VMware! I assume youve installed vmware on windows operating system. So let’s get started to install squid 3.5 on Ubuntu Server 14.04 virtual machine on Windows using VMware.
1. Install Ubuntu Server 14.04 on VMware
VMware is one of the most powerful software that allow you to build the virtual operating system that best supports Linux-based installation such a Ubuntu Server. In this case I have used VMware Workstation 10, the interface software is very understandable. We are going to install the Ubuntu Server 14.04 on this virtual machine on the main operating system Windows 7 32 bit.
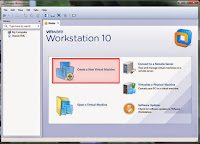
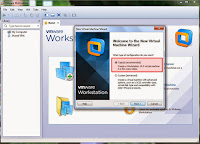
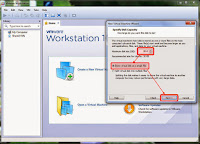
You can start to click Create a New Virtual Machine and you can choose Typical (recommended) as the above picture!
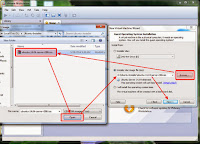
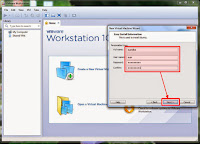
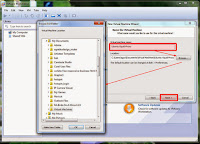
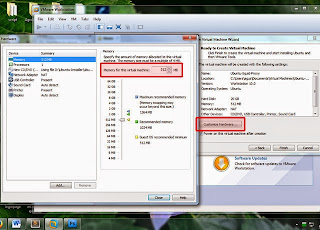
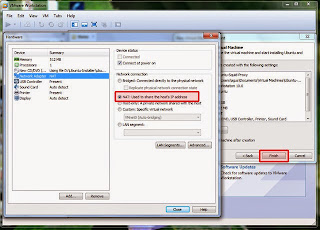
Then click next, you can browse to find the ubuntu-server iso/image installer file to the folder where you put the installer file, but if you are using ubuntu server installer on cd you can select installer disc to use your cdrom drive on your pc. After this you can fill personalize-linux with username and password that you will use to logged in every time when ubuntu server VM (Virtual Machine) started. Look at the picture below!
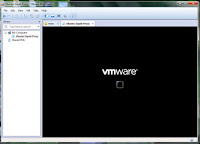
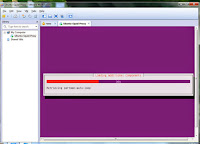
2. Adjustment Ubuntu Server VMware on Windows operating system
Ubuntu server is linux-based operating system, it’s very different from the windows operating system while we run ubuntu server on windows operating system using virtual mechine. By default, Ubuntu Server kernel is compiled with PAE (Physical Address Extensions) support. In some other virtual machine, it would be a problem. I personally would like to say that this is one of the advantages of VMware Workstations, it still allow us to run ubuntu server VMware on windows, but we need some adjustment in order to make ubuntu server can works properly.
VMware will ask you to install VMware tools to run ubuntu server, and you have to install it. It will download VMware tools and install it to the system automatically, then it will restart your ubuntu server after the installation vmware tools. But sometimes when you have the problem as shown like the left picture below! You must restart ubuntu server manually by clicking on restart guest icon VMware and VMware will install VMware tools during before ubuntu server started as show like the right picture below!
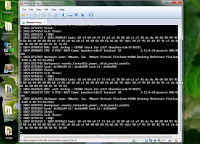
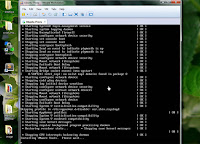
If you have used internet connection through USB, while ubuntu server first time start, it may disconnect your internet connection. We can uncheck usb connection to prevent ubuntu server virtual machine to use USB controller directly as shown like the picture below!
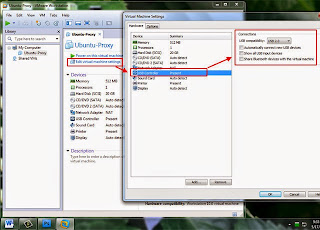
When ubuntu server first time to run/boot on VMware sometimes come up with the issues message :
- piix4_smbus 0000:00:007.3: Host SMBus controller not enabled! The issue come up because VMware actually doesn’t provide that level interface for CPU access, but Ubuntu server will try to load the kernel module anyway. We can fix it by adding “blacklist i2c-piix4” on blacklist.conf.
- intel_rapl: no valid ralp domains found in package 0 this message issue actually is non-obstructive, and when it occurs it doesnt affect the performance or functionality of the ubuntu server system, because its just a power management module, but to fix this issue we can add “blacklist intel_rapl” on blacklist.conf.
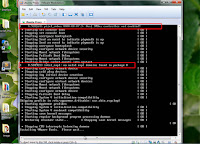
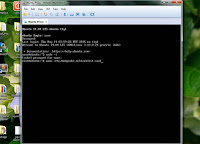
nano /etc/modprobe.d/blacklist.conf
After blacklist.conf is opened you can add this code on it :
blacklist i2c-piix4
blacklist intel_rapl
To save the changes of blacklist.conf, press ctrl+x, y , then enter. The blacklist.conf has been added and you can reboot the system again, then the issues message should be disappear.
Until this step we have already completed to Install and adjust Ubuntu Server 14.04 on VMware, and we ready to continue for the installation squid 3.5.4 as the transparent proxy on ubuntu server virtual machine. To be continue...
Available link for download

Monday, July 24, 2017
Benefit of using Spring Framework
Benefit of using Spring Framework
- Provide a good programming practice by decoupling the layers.
- If you are using spring in your project it decouples the layers and hence its easy to write the test case for them. So its easy from maintenance point of view.
- Provide convenient API to translate technologies specific(jdbc,hibernate,jdo etc) exception into consistent unchecked exception.
- It provide consistent transaction management interface that can be scale down to local and scale up to global transaction.
- Provide a lightweight IOC container specially if you compare it with EJB containers. So if you are using spring you do not have to worry about server maintenance even you can develop an enterprise application using tomcat only.
- Like EJB provide you the JMS server facility to do the asynchronous transmission Spring is going to provide you Event dispatch functionality that you can use in the replace JMS.
- If you are using spring in your project its easy to integrate with different frameworks like struts, hibernate, toplink etc.
- A well designed spring web MVC framework will provide you a new and better way to write a controller.
- IOC(Inversion of control) will give the facility to decouple the modules and AOP(Aspect oriented programming) that will give you the functionality to add the business layer services and easy to mentaine.
Available link for download
Saturday, June 24, 2017
Bandwidth Management on Mikrotik using Winbox
Bandwidth Management on Mikrotik using Winbox

Bandwidth share with PCQ (Per Connection Queue) principally is using the queue method to specify the bandwidth usage on the multiple clients. PCQ in the Mikrotik router already installed by default and a program to manage internet traffic network QoS (Quality of Service ). The Method of Bandwidth Management here in order to share bandwidth internet connection is equal among client that you have.
For example we have the internet connection bandwidth of 2000 kbps, and we want to share to 10 clients that will get the bandwidth allotted 2000/10 kbps = 200 kbps. and if we have 5 client that use the internet will divide 2000/5 kbps = 400 kbps. When 10 client using at the time, at the peak condition will get bandwidth quota around 100 kbps each other. Ok lets practice this !
- Assuming we have local network address 192.168.1.0/24 and the interface that connected to the local area network we called as "lan". and the interface that lead that led to the Internet Service Provider (ISP) we called as "public" (note it is up to you give the name of the interface, the function is just distinguish where the name intranet and internet).
- We will use Mikrotik Winbox to be interface software tool
- We will create a firewall setting mark
1. Okay we begin from the First Command
/ip firewall mangle add chain=forward src-address=192.168.1.0/24 action=mark-connection new-connection-mark=NET1-CM
Go to Winbox and, select IP > firewall >Mangle tab then click on "+" button will shown as the picture below:

On the General tab as shown as the picture above fill Chain : with forward, and Src Address : with local network IP address (192.168.1.0/24). After that still on Mangle Rule go to Action tab, will shown as the picture below :

Fill the form fields as shown as the picture above! if you do was right the result can be seen by click on IP > Firewall as shown below!

2. The second command is
/ip firewall mangle add connection-mark=NET1-CM action=mark-packet new-packet-mark=NET1-PM chain=forward
in order to making mark packet
enter through IP > firewall > mangle tab then click on "+" button

You just need to set up chain = forward and Connection Mark = NET1-CM, then go to the action tab

Completed the fields as the picture above, if you do was right, you can see the results by clicking again on IP > Firewall , as shown like the picture bellow :

3. The Third Command is Making queue types “with name of pcq_downstream”
/queue type add name=pcq_downsteam kind=pcq pcq-classifier=dst-address
Return to the main menu select Winbox Queues at Queue List select tab Queue Types then press button "+"

Completed the field as shown like the picture above!, Limit and Total Limit is depending on the ISP bandwidth that you have, in this case the internet connection that use is up to 2 mbps.
4. the Fourth Command is to make queue types “with name pcq_upstream”
/queue type add name=pcq_upstream kind=pcq pcq-classifier=src-address
Still on the main menu select Winbox Queues at Queue List select tab Queue Types then press "+" button

Just like downsteam, upsteam settings as above to adjust with your internet connection limitation totally
5. The Fifth Command is to make queue tree interface “lan”
/queue tree add parent=lan queue=pcq_downsteam packet-mark=NET1-PM
Starting from the main menu select Winbox again Queues at Queue List select tab Queue Three then press "+" button

Adjust the settings as shown like the picture above, the difference is the Parent, depending on your internet connection of your ISP, if you do not know, you can see that by clicking on the menu Interface from the main menu Winbox

In this case the name of lan interface is ether1, public interface is wlan1. if you have already know, completed with your Parent according with the name of your lan interface.
6. the Sixth Command is to make queue tree interface “public”
/queue tree add parent=public queue=pcq_upstream packet-mark=NET1-PM
begin from the main menu select Winbox again Queues at Queue List select tab Queue Three then press "+" button

Surely you can guess already what is the difference about the picture above that is the fields of the Parent, adjust the name according to your public interface.
Ok from six steps above I could have a summary. This is the short way if you dont want to take a long time. Go to the main menu of the winbox, this is the following practical steps:
For more details, lets see the following video ! hopefully useful for you and good luck!
/ip firewall mangle add chain=forward src-address=192.168.1.0/24 action=mark-connection new-connection-mark=NET1-CM
/ip firewall mangle add connection-mark=NET1-CM action=mark-packet new-packet-mark=NET1-PM chain=forward
/queue type add name=pcq_downsteam kind=pcq pcq-classifier=dst-address
/queue type add name=pcq_upstream kind=pcq pcq-classifier=src-address
/queue tree add parent=lan queue=pcq_downsteam packet-mark=NET1-PM
/queue tree add parent=public queue=pcq_upstream packet-mark=NET1-PM
Copy the six comment above into the notepad, and change the IP address marked with red color, green color is lan interface, public interface marked with blue, according to your internet connection. Then go to the main menu of Winbox, and click on the New Terminal. After you have changes the six steps above, then paste by right click on the active Terminal at the cursor./ip firewall mangle add connection-mark=NET1-CM action=mark-packet new-packet-mark=NET1-PM chain=forward
/queue type add name=pcq_downsteam kind=pcq pcq-classifier=dst-address
/queue type add name=pcq_upstream kind=pcq pcq-classifier=src-address
/queue tree add parent=lan queue=pcq_downsteam packet-mark=NET1-PM
/queue tree add parent=public queue=pcq_upstream packet-mark=NET1-PM
For more details, lets see the following video ! hopefully useful for you and good luck!
Available link for download
Sunday, April 23, 2017
Benefits of Using Milk In Home Remedies
Benefits of Using Milk In Home Remedies
CRB Tech reviews will focus on health benefits of milk in this blog. Milk is known to be a rich source of calcium. It is a good practice to drink a glass of milk in the morning.

But guess what?
There are huge benefits of using milk in various home remedies. After all, it is said to be mother natures perfect food.
Lets check the benefits of milk one by one.
1. Treatment of sunburn:
Have an excruciating sunburn? Make a milk pack by splashing a towel or cloth in icy milk says Life Hacker. Press the pack to the smoldered skin until you feel relief.2. Dry scalp treatment:
Milk is an amazing source of vitamin D, known to give a soothingly effect on the scalp and advance hair surface and shine. To treat a dry scalp, Health Guidance suggests blending 1/2 cup milk with 1/4 glass honey and applying the home cure straightforwardly to the scalp. Put a shower cap over your hair and unwind for 2 hours as the remedy works its magic.3. Moisturize the skin:
Milk is since quite a while ago utilized strategy for recuperating dry skin, reports Indian Express. The lactic acid in milk evacuates dead skin cells, while the vitamins and minerals in milk promote the development of sound skin cells, along these lines enhancing flexibility and suppleness. To utilize this home cure, mix 2 tablespoons nectar with 2 teaspoons milk. Apply the blend to your face, neck, and other dry zones of the body. Rest for 15 to 20 minutes and after that tenderly wash with water.4. Get rid of acne:
Like others, there are also benefits of milk on face. Lactic acid functions more than simply shed the skin. It likewise recuperates it. As per Womens Health Magazine, a thick glue produced using milk and flour is a compelling home solution for acne breakouts. Apply the home cure before sleep time and let it douse into the skin for the duration of the night. Wash in the morning.5. Become stress free and sleep well:
Theres scientific proof behind mothers encouraging to drink a warm glass of milk before sleep time. As indicated by Harvard Health Publications, drinking a glass of warm milk as a component of de-stressing evening time custom can set up the brain and body for relaxing sleep. One of the manybenefits of drinking milk at night for skin.
6. Live wrinkle free:
The lactic acid present in milk is a similar fixing utilized as a part of spa chemical exfoliants. Next time, avoid the costly facial and support collagen in a natural way by wiping your face and neck with a cotton cushion absorbed in milk. Womens Health Magazine says this at-home treatment fills in as a delicate exfoliant to smooth skin and lessen wrinkles.7. Bug bites:
Natural Living Ideas says the proteins in milk have calming and anti-itching properties that make milk a brilliant treatment for bug bites. To utilize this home cure, soak in a warm milk bath or touch the bug bite with a cotton ball dunked in milk.8. Calm the sore throat:
A standout amongst the best home solutions for a sore throat or cough is to gargle warm milk blended with 1/2 tablespoon turmeric and grounded dark pepper. You can gargle the blend or savor it in the morning and night, as prescribed by The Health Site.On the off chance that you are worried about included hormones or anti-infection agents in your milk, you can simply buy organic. In any case, a review by the FDA uncovered that in 2007, just 17% of all dairy cows had been treated with ox-like development hormones (bST or BGH). While to get the organic mark there are various different benchmarks that must be met, a hefty portion of your general brands are as of now without hormone.
CRB Tech reviews would recommend you to make maximum from this can be called gods gift.
Available link for download
Subscribe to:
Posts (Atom)